
Salads
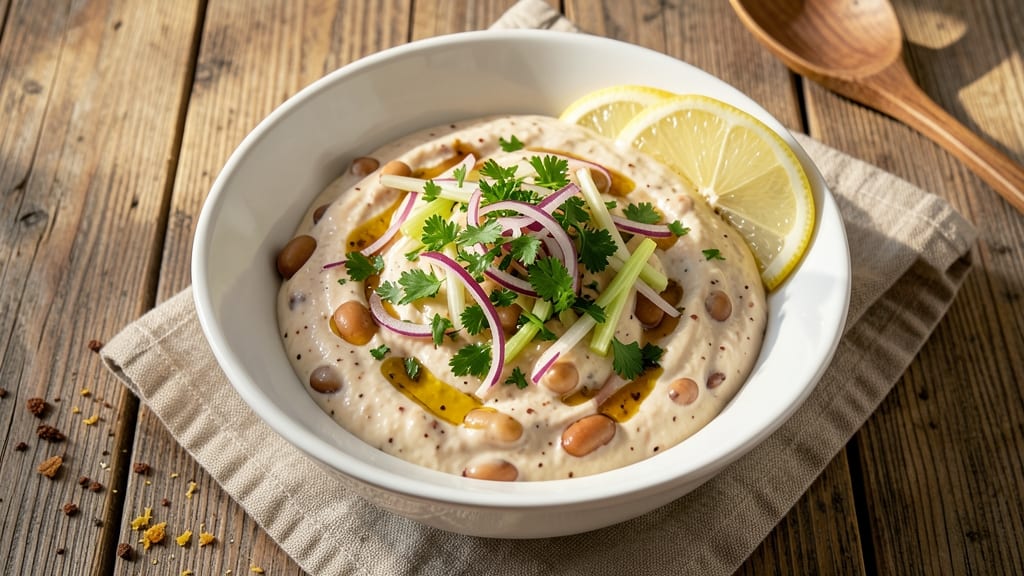
This bean salad dip recipe transforms humble white beans into a creamy, velvety masterpiece that’s perfect for dipping, spreading, or serving as a standalone dish.
The secret lies in blending tender beans with zesty lemon and fresh herbs, creating a texture that’s rich yet light—ideal for vegan diets without sacrificing depth of flavor. What makes this stand out is the crisp celery crown on top, adding a refreshing crunch that balances the creamy base.
The beauty of this recipe is its versatility—it works as an appetizer, sandwich spread, or side dish, and the ingredients are simple yet impactful. No fancy techniques required; just chop, mix, and chill for a dip that’s ready in under 30 minutes.
The lemon juice brightens the beans, while red onion and parsley add layers of freshness that keep it vibrant.
What you’ll end up with is a creamy, herb-infused dip that’s smooth yet textured, topped with crisp celery for a satisfying bite. It’s the kind of dish that feels indulgent but stays light, making it perfect for gatherings or a quick weeknight meal.
The flavors develop as it chills, so patience pays off with even more depth.
Serve with pita chips, crackers, or fresh veggies for a crowd-pleasing spread. This bean salad dip is proof that plant-based dishes can be just as satisfying as traditional favorites—without the compromise. Let’s get started!
Ingredients for bean salad dip
Transform humble white beans into velvety, herb-infused bliss with these 13 thoughtful ingredients.
| Ingredient | Amount | Notes |
|---|---|---|
| Canned White Beans 🫘 | 1 ½ cups | Drained and rinsed thoroughly |
| Extra-Virgin Olive Oil 🫒 | ½ cup | High-quality, fruity variety |
| Fresh Lemon Juice 🍋 | 2 tbsp | Freshly squeezed for brightness |
| Fresh Parsley 🌿 | ¼ cup | Chopped finely for freshness |
| Red Onion 🧅 | ¼ cup | Finely diced for mild bite |
| Fresh Celery 🧅 | ½ cup | Thinly sliced for crisp crown |
| Garlic Cloves 🧄 | 2 cloves | Minced for aromatic depth |
| Salt 🧂 | 1 tsp | Diamond Crystal preferred |
| Black Pepper 🌶️ | ½ tsp | Freshly ground for warmth |
| Tahini 🥜 | 1 tbsp | For nutty richness |
| Maple Syrup 🍯 | 1 tbsp | For subtle sweetness |
| Apple Cider Vinegar 🍏 | 1 tsp | For tangy balance |
| Water 💧 | ¼ cup | For blending consistency |
The white beans are the foundation—opt for cannellini or great northern for their creamy texture. Trader Joe's or Whole Foods carry the best quality in cans, but any low-sodium variety works if you rinse thoroughly. Fresh herbs elevate this dip, so buy parsley and celery from the market's produce section—they should be vibrant and crisp. The extra-virgin olive oil is non-negotiable; a California or Italian variety adds fruity depth that store-brand oils can't match. For the celery crown, select crisp, pale green stalks with no brown spots—this ensures that satisfying crunch on top.
No tahini? Substitute with 1 tbsp peanut butter for nutty richness, though the texture will differ slightly. Fresh lemon juice can be swapped for 1 tsp white vinegar plus 1 tsp sugar if needed, but the brightness is key. Red onion can be omitted entirely if you prefer a milder flavor, but it adds that subtle bite that balances the creaminess. For a quicker prep, pre-chopped frozen herbs work in a pinch, though fresh is ideal. The maple syrup and apple cider vinegar create a perfect balance—adjust to taste if you prefer more or less sweetness. If the dip feels too thick after blending, add 1-2 tbsp water to reach your desired consistency.
Store the dip in an airtight container in the fridge for up to 4 days, though it tastes best within 2 days. The celery crown should be added fresh just before serving to maintain its crispness. For meal prep, portion into small containers—this dip pairs perfectly with pita chips, crackers, or fresh veggies. Freezing isn't recommended due to the celery topping, but the base mixture without celery can be frozen for up to 3 months. The flavors deepen as it chills, so let it sit for at least 1 hour before serving for the best texture and taste.
Why You'll Love This Recipe
- No Pantry Hoarding: I swear by this dip because it lives in my fridge year-round—no fancy ingredients, just a can of beans, a lemon, and whatever’s in my fridge drawer. The red onion adds that sharp bite without needing a spice rack, and the olive oil ties it all together with zero fuss.
- Bright & Tangy Magic: That lemon juice? It’s the MVP here. The second I add it, the beans go from bland to ridiculously good—creamy, zesty, and fresh like a Mediterranean breeze hit my kitchen. The parsley finishes it with a pop of green that makes it look as good as it tastes.
- Game for Any Occasion: Spread it on toast for brunch, scoop it with chips at a party, or toss it into a wrap when I’m too tired to cook. Honestly, I’ve even used it as a pasta sauce in a pinch—because when you’ve got great flavors, why not lean into them?
- Leftovers That Don’t Suffer: This dip actually improves overnight. The flavors meld, the onion softens just enough, and I’ve had it last in my fridge for five days without turning sad. (Yes, even on a Tuesday night.) Plus, it’s dirt cheap—canned beans and a lemon won’t break the bank, and I always have both.
Step-by-step instructions for creamy white bean salad dip
Transform simple pantry staples into velvety, herb-infused bean dip with this precise technique.
Blend the Base Ingredients to Smooth Perfection
Combine the 1.5 cups drained and rinsed canned white beans, 0.5 cup extra-virgin olive oil, 2 tablespoons fresh lemon juice, 1 tablespoon tahini, 1 tablespoon maple syrup, 1 teaspoon apple cider vinegar, and 0.25 cup water in a high-powered blender. The tahini and olive oil will create an immediate emulsifying action—this is crucial for achieving that signature creamy texture.
Blend on high speed for 30-45 seconds until completely smooth, scraping down the sides as needed. You're aiming for a thick, velvety consistency similar to hummus but with a lighter body. If it's too thick, add 1-2 teaspoons of water at a time until it reaches a spreadable but still substantial texture. The lemon juice and vinegar will brighten the flavors while balancing the richness of the tahini and olive oil.
Season and Incorporate Fresh Aromatics
Transfer the blended mixture to a medium bowl and stir in the 1 teaspoon salt, 0.5 teaspoon freshly ground black pepper, 2 cloves minced garlic, 0.25 cup finely chopped fresh parsley, and 0.25 cup finely diced red onion. The garlic and parsley will add layers of aromatic complexity, while the red onion provides a subtle crunch and mild bite that cuts through the creaminess.
Taste and adjust seasoning—this is where the magic happens. You might need an additional ½ teaspoon of salt or 1 teaspoon of lemon juice to achieve perfect balance. The dip should be rich but not overpowering, with bright acidity from the lemon and vinegar. Let it sit at room temperature for 10 minutes to allow the flavors to meld completely.
Prepare the Crisp Celery Crown Topping
While the dip rests, slice the 0.5 cup fresh celery into thin, even strips—this is your crisp crown topping. I like to use a mandoline for precision, but a sharp chef's knife works too. The celery should be cut into ¼-inch thick strips that will maintain their crisp texture when layered on top.
Spread the dip into a shallow serving dish or bowl, creating a smooth surface. Arrange the celery strips in a circular pattern on top, slightly overlapping them to create a continuous crown. The contrast between the creamy dip and crisp celery is what makes this dish visually stunning and texturally exciting.
Chill and Serve for Optimal Texture
Cover the dip and refrigerate for at least 1 hour before serving. This chilling period allows the flavors to fully develop and the celery to maintain its crispness. The dip will thicken slightly in the fridge, which is perfect for scooping and dipping.
When ready to serve, garnish with an additional sprinkle of fresh parsley and a drizzle of extra-virgin olive oil if desired. The celery crown should remain crisp and vibrant, providing a delightful textural contrast with each bite. Serve with warm pita bread, crisp vegetables, or as a spread for sandwiches—this dip is incredibly versatile while maintaining its elegant presentation.
Pro Tips For Making Bean Salad Dip
- Drain and Rinse Beans: That canned bean liquid is salty and starchy—skip it. Dump the beans into a colander, rinse under cold water, then give them a good shake to remove excess moisture. I learned this the hard way after a dip turned into a watery, gluey mess.
- Soak Onion in Ice Water: Thinly sliced red onion? Toss it in a bowl of ice water for 10 minutes first. The cold stops it from bleeding and turning bitter. Drain well before adding—no one wants a sad, watery dip.
- Mash Half the Beans: Don’t blend everything smooth—leave half the beans whole for texture. Use a fork to crush about 50% of them, then stir in the rest. This keeps the dip interesting and prevents a mushy, one-note consistency.
- Add Lemon Gradually: Start with half the lemon juice, taste, then add more if needed. Too much acid kills the bean flavor, and you’ll end up with a sad, tangy puddle. A little at a time guarantees balance—no regrets.
Pro cooking tips for perfect results
Blend Like a Pro
Your high-powered blender is the secret weapon here—I recommend the Ninja BN600 for its consistency and ease of use. Start with cold beans straight from the fridge to prevent overheating and ensure a smooth texture.
Pulse briefly first to break up any large chunks, then blend continuously for 30-45 seconds on high. The tahini and olive oil will emulsify naturally, creating that signature velvety texture. If your blend feels grainy, strain it through a fine-mesh sieve for ultra-smooth perfection. 🔥
Emulsify with Confidence
The key to creamy success is patience—don’t rush the blending process. If the mixture separates or looks too thick, add water 1 teaspoon at a time while blending. The tahini acts as a natural emulsifier, but the olive oil needs time to fully incorporate.
For extra insurance, add 1 teaspoon of Dijon mustard to the blend—it stabilizes the emulsion beautifully. The result should be thick but spoonable, with no separation when left to sit. 💫
Seasoning Mastery
Taste as you go—this is where most home cooks go wrong. After adding salt, pepper, and fresh herbs, let the dip rest for 10 minutes before final adjustments. The flavors need time to meld, and the lemon juice will brighten as it sits.
If it needs more acidity, add ½ teaspoon of apple cider vinegar at a time. For depth, a pinch of smoked paprika adds warmth without overpowering. The goal is balance: creamy, bright, and never one-note. ✨
Celery Crown Perfection
Your celery topping should be ¼-inch thick slices for the best texture. Use a sharp knife or mandoline—dull blades crush the celery, making it soggy. Arrange the strips in a circular pattern on top, slightly overlapping for a seamless look.
For extra crunch, chill the celery in the fridge for 15 minutes before assembling. This trick keeps it crisp even after sitting out for 30 minutes. The contrast of creamy and crunchy is what makes this dip irresistible. 💪
Chilling for Depth
Never skip the 1-hour chill time—this is when the flavors truly develop. The dip will thicken slightly, making it easier to scoop and serve. Store it in an airtight container with parchment paper pressed against the celery to preserve crispness.
If serving later, garnish with fresh parsley and a drizzle of olive oil just before eating to keep it vibrant. The longer it chills, the more complex the flavors become—trust the process! 🌟
Nutrition facts
Frequently asked questions
Can I make this bean salad dip without tahini?
If you don't have tahini, substitute with 1 tablespoon peanut butter or 1 tablespoon olive oil plus ½ teaspoon Dijon mustard to help emulsify the mixture. The texture will be slightly different but still delicious. For a nut-free option, simply omit it and add an extra ½ teaspoon of lemon juice for brightness.
How long will this dip keep in the fridge?
This creamy bean salad dip stays fresh for up to 4 days when stored in an airtight container. For best quality, add the celery crown just before serving to maintain its crispness. The base mixture (without celery) can be made 2 days ahead for even better flavor development as the ingredients meld together.
What are the best ways to serve this dip?
This versatile dip works perfectly as an appetizer with pita chips or veggie sticks, as a sandwich spread on toasted baguette slices, or as a side with warm naan or crackers. For a heartier meal, serve it alongside grilled chicken or falafel—the creamy texture pairs beautifully with both sweet and savory flavors.
Why did my dip turn out too thick or too thin?
If your dip is too thick, add 1-2 teaspoons of water while blending until you reach a smooth, spreadable consistency. For a thinner texture, blend in an extra 1 tablespoon of olive oil. The key is the tahini—it naturally thickens the mixture, so if you used a different substitute, adjust the water accordingly. Always taste as you go to achieve perfect balance!
Can I make this dip with different types of beans?
Yes! While cannellini or great northern beans work best for their creamy texture, you can experiment with chickpeas or black beans for a different flavor profile. For chickpeas, add an extra 1 tablespoon of lemon juice to brighten their earthy taste. Black beans will give a richer, slightly smokier flavor—adjust the seasoning accordingly. Always drain and rinse your beans thoroughly before blending.